
False floors, also known as raised floors or access floors, are a clever solution that creates an empty space beneath the floor’s surface to allow the installation and maintenance of electrical, plumbing, and HVAC systems. This modular flooring system has become an incredibly popular choice among architects and contractors working on commercial buildings and high-tech facilities.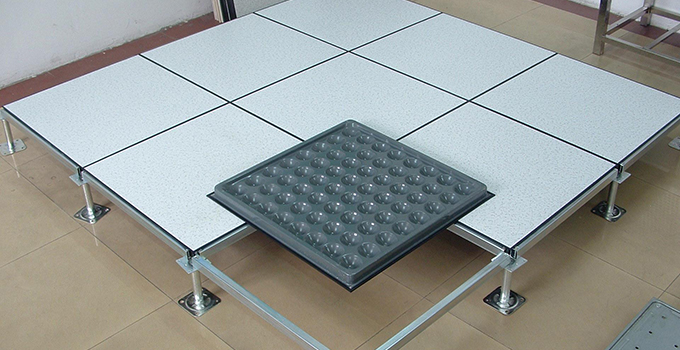
In this guide, we’ll explore everything you need to know about false flooring – from definitions and components to major benefits and proper installation. Read on to learn why false floors may be the ideal flooring choice for your next construction or renovation project.
What is a False Floor?
False flooring refers to a modular, removable floor system that is installed atop a building’s concrete slab or existing floor. Pre-fabricated floor panels are placed on adjustable pedestals, creating an empty space below that can house electrical wiring, cables, ductwork, and piping. This plenum space – usually 2-4 feet high – allows critical building systems to be hidden from view yet remain conveniently accessible for upgrades and repairs.
False floor panels are typically 2×2 or 1×1 feet in dimension. They are designed to be interchangeable and easy to remove individually when access to the underfloor cavity is needed. Common panel materials include steel, aluminum, cement, polypropylene, or wood cores encapsulated in a protective metal shell. The panels can support various floor finishes like tile, vinyl, laminate, stone, or carpet.
Other names for false flooring include:
- – Raised floor or raised access floor
- – Cavity floor
- – Access floor
- – Computer floor
- – Modular floor
- – Double floor
This elevated modular floor system should not be confused with a floating floor or a raised foundation. False floors create an intentional cavity, while floating floors are not removable and merely provide a layer of insulation. Raised foundations lift the entire permanent floor level for construction purposes.
Components of False Flooring Systems
While simple in principle, false flooring requires a well-engineered system to function properly. The main components of false floors are:
Floor Panels
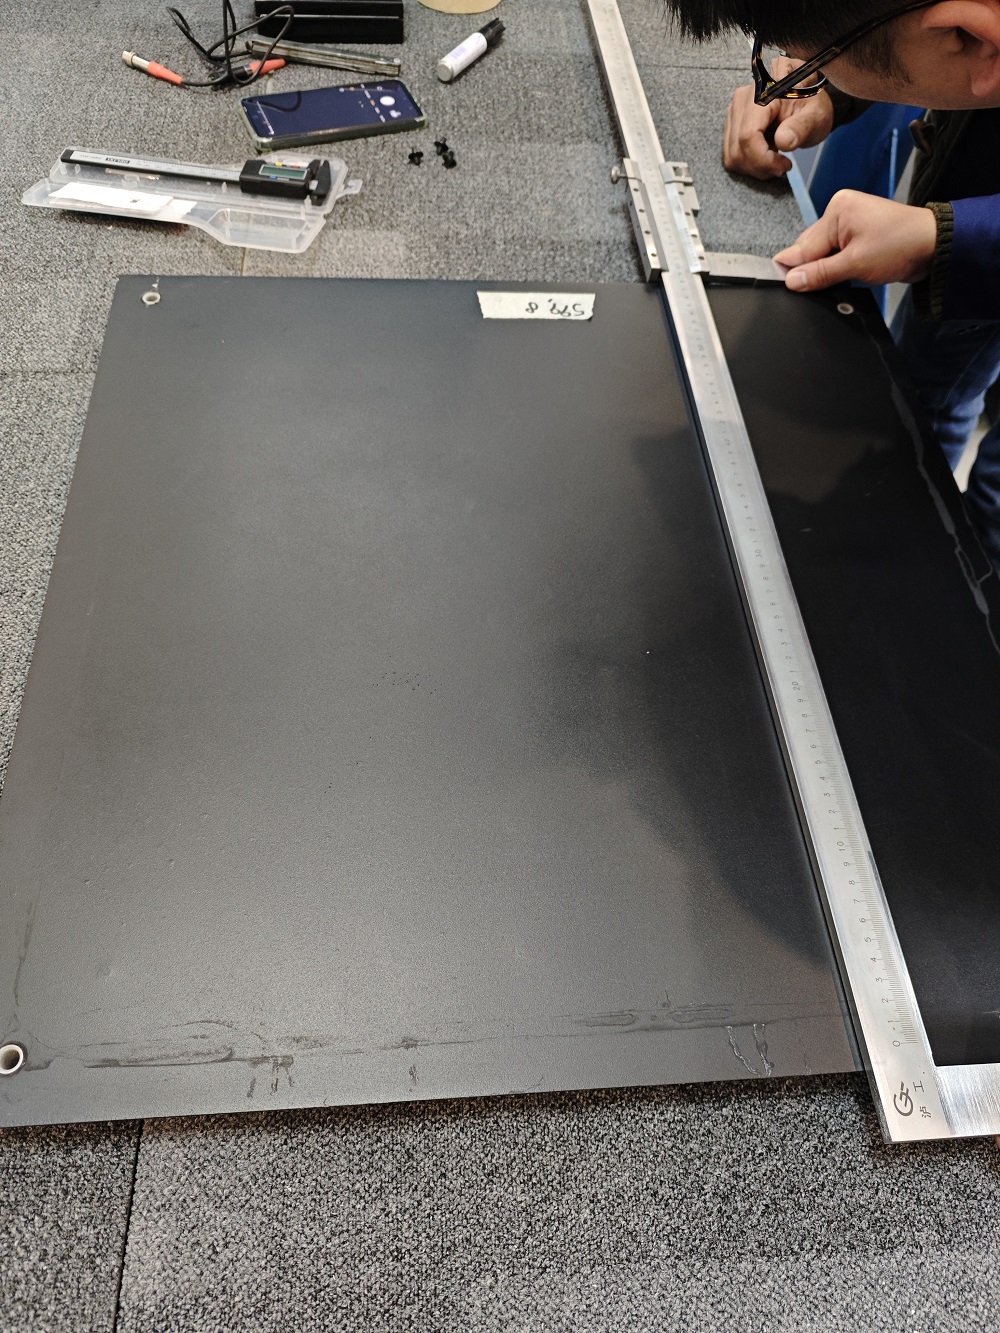
The removable floor panels typically measure 24″ x 24″, but 18″ x 18″ and 24″ x 48″ are also common. They consist of a core material laminated between a steel or aluminum top and bottom sheet for rigidity. Common core materials include:
- – Wood products (particle board, plywood)
- – Cement
- – Steel
- – Aluminum
- – Polypropylene
- – Calcium sulphate
The panels have a thin vinyl, laminate, stone, tile, or carpet finish layer. Bare panels without a finish are also available when appearance is not important. Panel thickness is usually 1 to 1.5 inches.
Pedestals
Pedestals provide the adjustable support for the raised panels. They attach to the subfloor with adhesive, clips, magnets, or bolts. The height of the pedestal stems ranges from 2 inches for low-profile floors up to 48 inches for tall cavities. The stems are threaded so the height can be precisely adjusted by rotating a nut up or down.
A steel pedestal head (also called a cap or base) mounts to the top of the stem and supports each corner of the panel. Pedestals are available in fixed or adjustable heights.
Stringers
Stringers or stringer systems add lateral stability between rows of pedestals. These interlocking bars connect the pedestal heads together both horizontally and diagonally. Stringers evenly distribute loads and stiffen the entire modular floor assembly.
Grommets
Openings in the floor panels allow cables to pass between the plenum space and the occupied room above. Rubber grommets seal these holes against air leakage and moisture. The grommets have removable caps to facilitate cable moves and additions.
Ramps
Low-profile ramps that match the flooring provide smooth transitions between different floor heights. These eliminate trip hazards between rooms with raised floors and standard floors.
Adhesives and Sealants
Specially formulated construction adhesives affix the pedestal bases to the subfloor. Acrylic or polyurethane sealants close up all gaps at walls, corners, and penetrations to prevent air leakage.
Grounding
All pedestal components must be properly grounded to eliminate static charge buildup. Grounding kits tailored for access flooring provide the materials needed establish a safe electrical ground.
Why Install a False Floor?
There are several excellent reasons to consider using a false floor system:
Easy Access to Building Systems
The primary advantage is easy access to the electrical, communication, and mechanical systems concealed underneath the floor panels. This allows for faster maintenance, upgrades, troubleshooting, and reconfigurations without need for major demolition or construction. Cables and wires can be rerouted as needed to accommodate changes in technology, equipment, or office layouts.
Flexibility and Adaptability
False floors allow changes to be made quickly and with minimal business disruption. New power outlets or network connections can be installed by simply lifting a few panels. Entire office layouts can be reconfigured thanks to this modular flexibility.
Air Distribution and Ventilation
Gaps between the panels facilitate improved airflow and ventilation. The underfloor cavity serves as a large duct to provide heating and cooling throughout the space. Vents in floor tiles allow conditioned air to rise into a room and create a comfortable environment. This is more efficient than ceiling-based distribution which can be hampered by office dividers.
Sound Insulation
The void space also buffers noises and absorbs sound. This enhances privacy between rooms by reducing echo and transmission of conversations or equipment noise. Adding insulation enhances this sound dampening effect.
Aesthetic Appeal
False floors provide a clean, seamless appearance since wires and ductwork are hidden from view. The modular panels can also be customized with company logos, patterns, or multiple colors/finishes for a unique look.
Simplified Electrical Design
Since power cables have free range underneath the panels, electrical plans are simplified without need to route conduit through walls and ceilings. Outlets can be positioned anywhere without restriction. This flexibility is especially valuable for configurable spaces like data centers and control rooms.
Safety
The void space allows power and data cables to be separated and run in different directions. This enhances electrical safety and prevents interference. Access floors also provide an ideal channel for fire suppression water lines and alarms.
LEED Credits
Raised floors can help projects qualify for LEED (Leadership in Energy and Environmental Design) credits. Points are awarded for improved ventilation, recycled content, and ease of disassembly/reconfiguration.
Where are False Floors Used For?
False flooring provides benefits for a wide range of building types, including:
- – Office spaces
- – Data centers
- – Network operation centers
- – Call centers
- – Control rooms
- – Laboratories
- – Libraries
- – Schools
- – Airports
- – Hospitals
- – Shopping malls
- – Broadcast studios
- – Performing arts venues
- – Residential buildings
Anywhere that requires maximum flexibility, simplified access to infrastructure, and efficient air distribution can benefit from a raised floor system.
What to Consider Before Installing a False Floor?
Installing a raised access floor system requires careful planning and preparation to ensure optimal performance and safety. Be sure to consider these key factors:
Floor Height
The floor height depends primarily on the depth needed for the underfloor plenum space. Common heights range from 6 inches for a shallow cavity up to 36 inches for maximum capacity. Measure the overall room height to ensure adequate space remains between the false floor and true ceiling.
Consider existing ductwork, piping, and conduits that will need to pass through the cavity. A taller plenum may be needed to accommodate large pipes and deep cable trays. Access hatches should also factor into the height calculation.
Weight Load
Determine the floor’s load capacity by considering rolling loads like carts and stationary loads like server racks or safes. Typical false floor ratings range from 250 to 1000 lbs. per square foot. Work with an engineer to specify the correct panel thickness, pedestal type, and stringer layout to handle projected weights.
Interior Layout
Review potential equipment locations, workstations, and aisleways when laying out panel sections. Coordinate openings for stairs, drains, and other penetrations through the access floor. Plan removable panels or hatches near equipment that may require frequent maintenance.
Perimeter Containment
Prevent debris from falling into the cavity by outlining the entire perimeter with a curb. The curb also strengthens the floor edge. Allow at least 4 inches between the false floor edge and any walls or columns.
Grounding Requirements
Establish an electrical ground for the entire modular floor system per national electric codes. Properly grounded floors prevent static buildup that could damage sensitive electronics. Copper grounding strips around the perimeter connect pedestals together and to the room’s ground.
Fire Ratings
Building codes require flame spread ratings for raised floor panels and pedestals. Class A ratings are typical for fire resistance. Bare steel panels generally meet Class A requirements, while wood and plastic core panels need additional treatments.
How to Install a False Floor?
Once you’ve addressed planning considerations, it’s time to tackle the physical installation. Proper installation is critical for safety, functionality, and longevity. Here is the basic process:
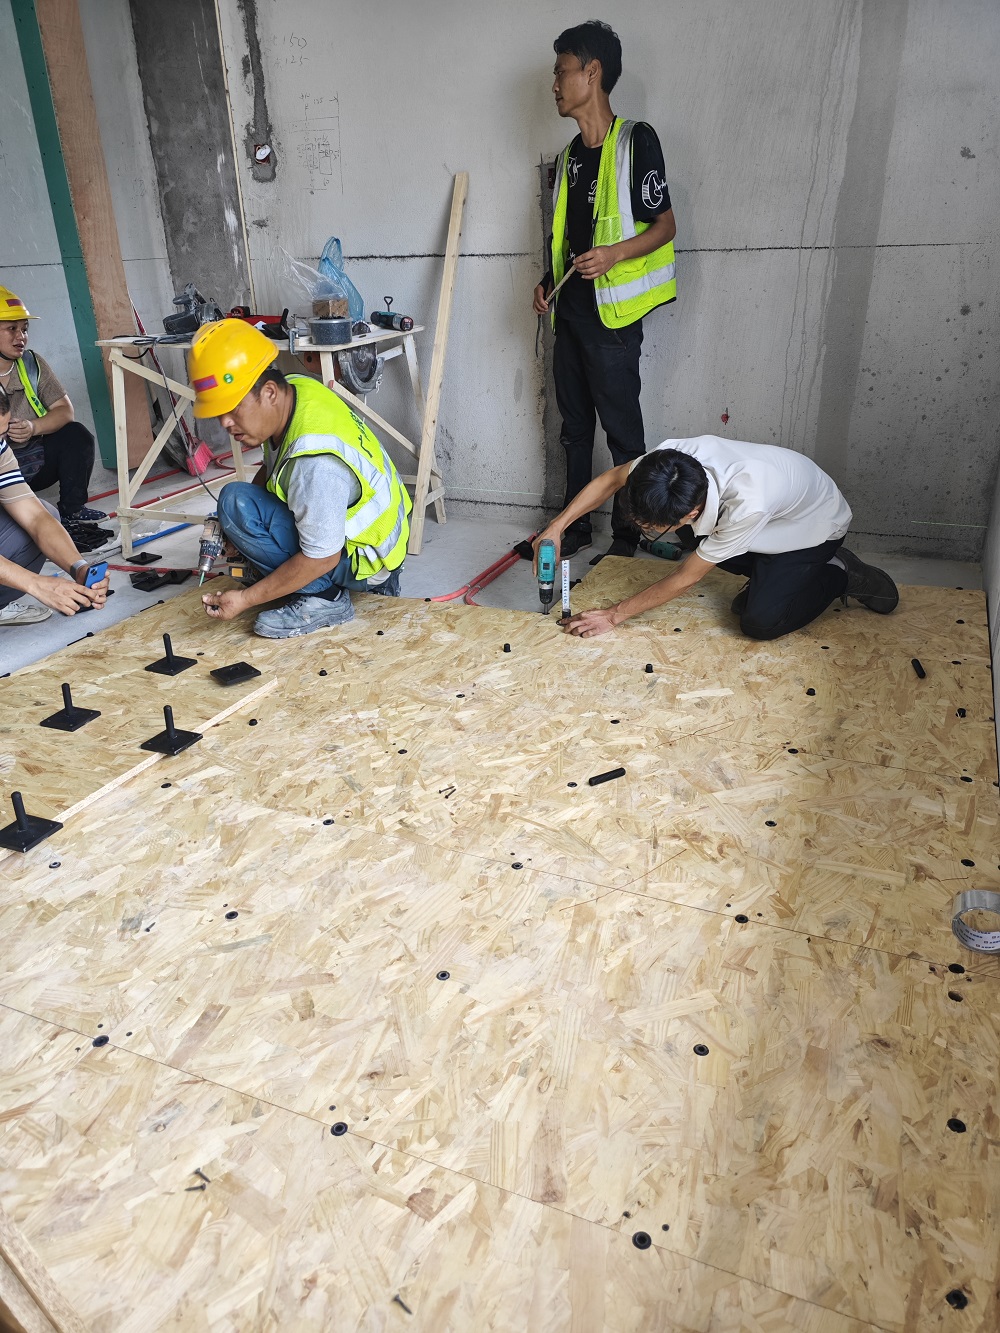
Survey and Prepare the Subfloor
- Remove any debris, dust or oil from the subfloor.
- Fill any cracks or holes to create an even surface.
- Check that the subfloor is level using a spirit level or laser level. Address any uneven spots.
- Clean the floor with a vacuum and damp mop. Allow it to fully dry before installing pedestals.
Outline the Perimeter
- Mark the boundary for the new false floor using chalk lines or tape. Leave a 4-6 inch gap between the edges and any walls.
- This gap allows room to install edge trim and ramps between floor heights.
- Consider existing floor drains, doorsills and other obstructions when laying out the area.
Install the Pedestal Bases
- Map out pedestal locations on a grid pattern, usually 24 x 24 inches. Adjust to evenly align with floor panels.
- Use pedestal manufacturer’s recommended adhesive to glue bases to the floor. Avoid thinset mortar.
- Allow the adhesive to cure completely according to directions before loading weight.
Adjust Pedestal Heights
- Thread pedestal stems into bases and use a nut to adjust overall height.
- Use a laser level or transit to ensure all pedestals are precisely leveled across the whole floor.
- Account for final flooring thickness when setting heights. Leave 1/16″ gap below panels.
Add Stringers
- Attach stringers horizontally between pedestal heads to stabilize the structure.
- Add diagonal stringers at regular intervals for racking strength and rigidity.
- Stringers evenly distribute loads and prevent swaying or bouncing.
Install Floor Panels
- Lower the first panel into position atop the pedestal heads. Align carefully.
- Add panels one-by-one, establishing the layout pattern. Slide into place gently.
- Use ramps or gradual transitions where floor height changes to prevent tripping.
Connect Grounding
- Bond all pedestal components together with grounding strips per electrical code.
- Perimeter grounding establishes path to room’s ground connection point.
- Ground individually lifts panels before removing to avoid static discharge.
Finish Edges
- Attach edge trim pieces around the entire perimeter to conceal gaps.
- Caulk between trim and walls with acoustical sealant.
- Add ramps at transitions to maintain wheelchair accessibility.
Add Floor Covering
- Choose decorative vinyl tiles, carpet squares, laminate, or other modular covering.
- Follow manufacturer’s directions for installing and bonding flooring to panels.
- Be sure coverings meet local fire code classifications.
- Following these steps correctly will result in a safe, functional false floor tailored to your space requirements. Maintain the finished floor per manufacturer directions.
Where To Order False Floor System for Your Project?
Introducing the HuiYa False Floor System – the modern solution for maximum adaptability, simplified maintenance, and enhanced airflow in commercial spaces. Our innovative raised access flooring creates an underfloor cavity that neatly conceals all electrical, IT, and mechanical infrastructure. Wires, cables, ductwork, and piping disappear from view yet remain easily accessible for changes and upgrades. No more tearing into walls or ceilings for system updates!
You’ll appreciate the many benefits:
- Quick reconfiguration for evolving workspace needs
- Climate control through pressurized underfloor air distribution
- Reduced construction costs by simplifying electrical routing
- Customizable floor finishes like carpet, tile, laminate, or stone
- Enhanced acoustics with sound-dampening plenum space
- Meets all ADA accessibility and fire rating requirements
With over 20 years of engineering experience, we expertly design raised floor systems for flawless performance. Our project managers handle the entire process from concept to completed installation, including permitting and inspections. All work is backed by an industry-leading 15 year warranty.
Contact us today for a free quote on revolutionizing your space with the amazing flexibility and utility of the Modular False Floor System! We can’t wait to show you how our access flooring can maximize the potential of your next commercial project.
Huiya Real-Time News
Huiya Real-Time News is dedicated to providing you with the latest and most authoritative information on the raised flooring industry.
We provide 24/7 updates on industry policy interpretations, market trend analysis, company news.

匯亜総経理、常州市文化交流協会の日本視察団に参加|匠の文化と経営の道を学ぶ

匯亜OAフロア、日本・福伸電機を訪問 -リーン生産方式と企業経営のノウハウを深く学ぶ
湖州にて日本式二重床システムの現地調査:商業用フリーアクセスフロアから住宅市場への新たな機会 | 汇亚
HUIYA社、JIS A 1450試験装置を完成させ、日本のOAフロア市場向け日本規格への適合を実現
MORE DOWNLOADS

GENERAL CATALOGUE

HUIYA INTRODUCTION

HUIYA GREEN LABEL

CAD/BIM FULL STEEL
APPLICATION SCENARIOS


